
 WARREN KERFOOT shows us how to make space for the curves on your layout.
Whether you're working on your first train set, or have been in the hobby for an age, there's one question all railway modellers mull over - and that's the question of space.
We all set off with an amazing grand plan - loads of sidings, a turntable, four ovals, the 10-road engine shed, of course… and more and more 'stuff' that our imagination conjures up for us. I think the first thing we all fail to allow for is curves. Curves take up far more room on the baseboard top than we ever really thought possible and with a lot of the modern models needing larger and larger radius curves to go round because of all the detail on them.
What I've done in this article is referenced to OO/HO modellers, but the principles are just the same if you model in N, or Z, or O, or you're in the garden with G Scale.
If you're using set track pieces, so say Hornby or Peco Setrack, or indeed any other brand like Kato etc., the radius is quoted but this is to the middle of the track; the centre line of the sleepers in fact. So if you were looking at 2nd radius, which nearly all the model manufacturers quote as the minimum tightest curve they recommend for their models, in OO/HO Hornby or Peco that's 438mm radius. Twice that to make the half circle of an oval, so 876mm, but this is to the centre of the track, not the outside edge and in reality you need to have at the very least another 50mm for all the track to be on your table top. This equates to 36½ inches in imperial. Go to the next radius up in Hornby to R609 and we're up to 42” as a minimum… and you'll probably find that a lot of the proprietary steam outline locos now require 3rd radius too.
But then to add more problems, you must allow for your models 'swinging out' as they come round a curve; the rule of thumb being the longer the model going round the more it will swing out. So, while your track may happily go to the edge of your board, as your new £50 coach comes round it hits the platform or, worse still, the wall your layout is up against!
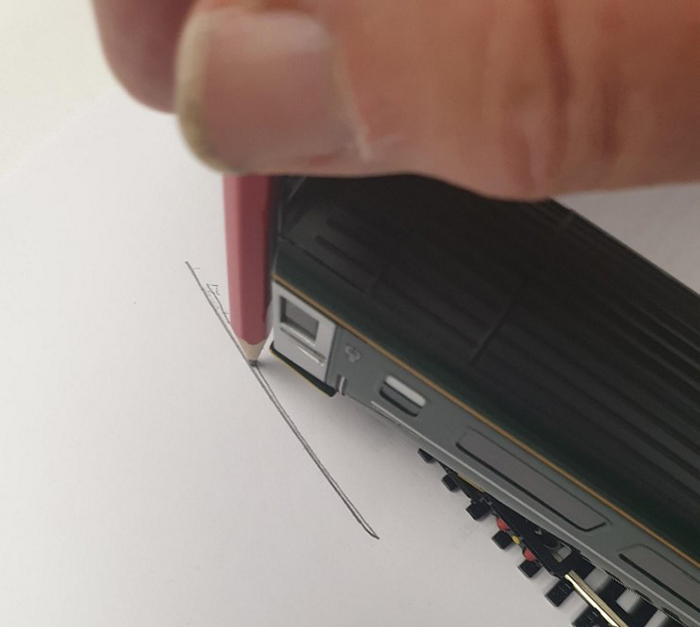
A simple way to check these clearances is to nestle a pencil in between the buffer and the buffer beam on the model's far corner…and then push the model round…the pencil will then mark out how much clearance it will need.
This principle applies to pretty much everything to do with the initial stages of your planning and construction. It's what will make your layout take shape and dictate how long your platforms are, where they are, where the station canopy is, where you position a tunnel mouth or your signal box.
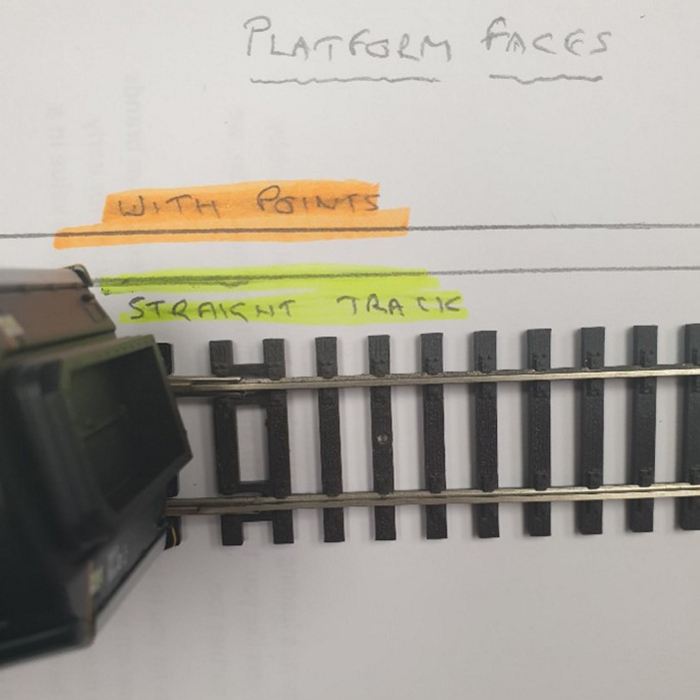
In the same way too, remember that when your coach goes round this curve you are thinking of, whatever it's doing at the front end, it's doing at the back end as well. Obvious you might think, but if you put a set of points in your station area, as the coach negotiates the double curve, it's back end will swing out and hit your platform's front face - something it wouldn't have done going straight and will mean you'll have to push your platforms back!
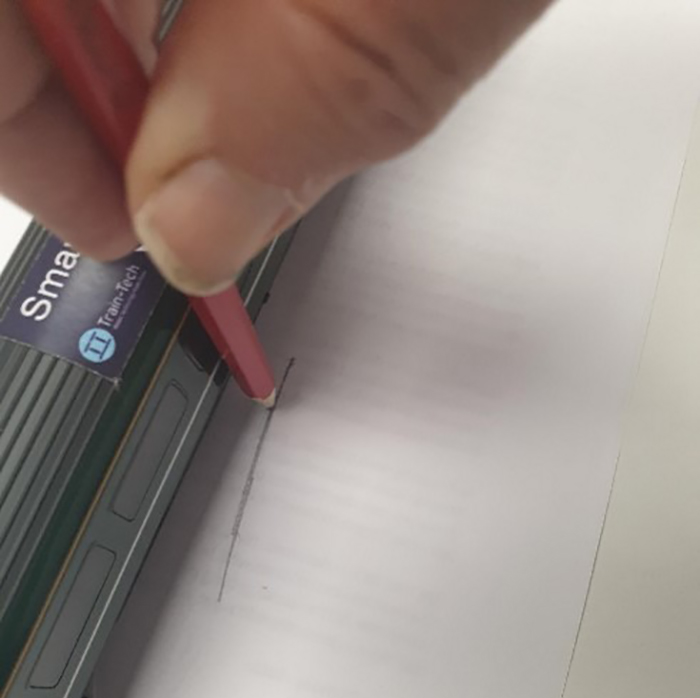
Additionally, the same pencil needs to be placed in the middle of your longest model. This will show how much it 'cuts in' as it goes round. This is just as important for clearance as what it's doing at the front and rear of course. If you're having two or more running lines, when these gorgeous models you've spent hard earned money on reach the curves they can swing out on one line, while on the other the other train cuts in. They bash into each other causing mayhem at best, or damage at worst.
And please remember, those expensive models running right on the edge of your board will almost always fall off where there's nothing to stop them falling straight to the floor - so it's best, to push your track back from this perilous edge, by at least the height of your tallest model. So say 50mm or 2” as a minimum, because probability and gravity hate railway modellers and will conspire to ruin our lives at every opportunity!
And now comes to the 2nd evil of the curve - how much straight track you'll have left when the curves go in at each end. Lets say you have an 8'x4' board; using R607 curves as our example, you'll see that 3' of your 8' board length will be gobbled up instantly. Put an outer of R609 or 4th radius (the largest and most 'gentle' of the set piece curves for OO modellers) you use up more of your potential straight run in your oval.
With R609, it's 3'6” to go from straight to straight in the oval, and the largest will be at the maximum for the board's width of 4'.
Here's comparison which I hope looks clear. I've shown the extreme of the R605 (this is the tightest curve in Hornby's range and really only suitable for the smallest models nowadays like 0-4-0 shunters) and the R609, the 3rd. radius. You can see how much the swing out is reduced by using the R609 compared the R605. Yet conversely the amount of 'cut in' is pretty much the same between the two radii.
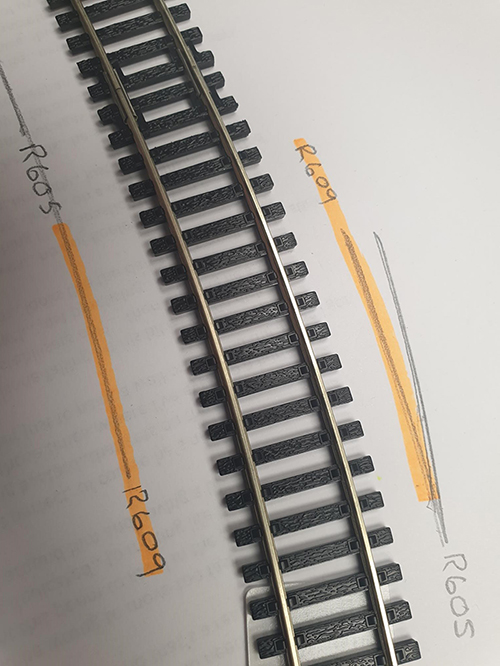
For this, I used a very long modern coach and that accentuates the amount it swings out and cuts in. If you use steam era coaches, you'll see these amounts get less because the overhangs are less. If you plan to just run 4-wheel wagons or coaches you'll see this allowance reduce to the bare minimum.
So, in conclusion, think about what models you want to run. Long models, modern coaches, a Class 37 Diesel, or a Flying Scotsman are all lengthy, so your curves will want to be as large as possible to minimise the risk of collisions. If you want to run 0-6-0 locos with trains of mineral wagons you'll be able to tighten the curves up and by default get more on your board.
If the above seems still bewildering, please invest in a couple of the very good plans books which are dedicated to the set track design.
PEIN-1 N Gauge Setrack Planbook
Next time... I'll go through the possibilities of flexi track - be afraid… be very afraid!