
 JAMES HICKMAN looks at the different types of brushes, their uses, and how to look after them.
In many of our Right Lines articles, mine included, we talk about painting - though we have never really looked at what to use. Generally, every painting job requires paint of some sort and whether you prefer acrylic or enamel, you will still require a brush to apply the paint with.
Just a quick look through the Humbrol and Revell ranges throws up a vast array of brushes, so how do you choose the one that's right? Well, to start with, we need to look at the different types of brush available.
There are three main different types of brushes, with each type of brush having different styles within it. The largest type of brush is the Trade Painter's Brush. These brushes are generally large brushes designed to cover large areas and quickly. Second is the smaller Decorator's Brushes. These are large brushes ranging from 10cm up to 4 inches. These are the sort of brushes found in hardware stores for uses for around the home. The third is the most varied of the three, and that's the Artist's Brush. Most brushes used for modelling fall into this category.
As this is a modelling e-Zine I won't go into further details on the other two types of brushes, but we will look at the different styles of Artist Brushes. Although others may exist, the graphic below shows you the main styles of artist's brushes available. Of the ones shown, the main brushes we tend to use as modellers are the Round, Flat, and Bright.
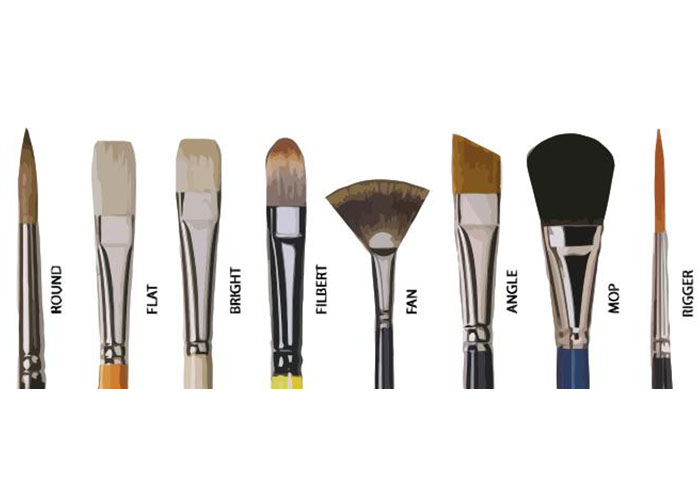
The Flat and Bright are generally used more for scenic applications, painting larger road areas or bases on which flock or other scatter is to be applied. That said, they are also good for applying washes. The main difference between these two is that the Bright brushes have a curved edge. This makes them ideal for washes, whereas the Flat brushes are more suited for stippling. It is possible to buy brushes specifically described as stipple brushes, however these tend to be a round brush, mainly obtainable from craft shops, but a flat will work well for this too.
That brings us onto the Round Brush. This type of brush is the most common among modellers tool kits. They vary in sizes from 20/0 to 30. Although the majority of manufacturers' brushes are around the same sizes, there is no specific measurements of these brushes, and it is up to each manufacturer on the exact size of each brush. That said, the 4 will always be smaller than the 5 and larger than a 3 and so on. Most model manufactures will produce brushes from 5/0 to 12 sizes, so you just need to choose what size of brush is most suitable for the job at hand.
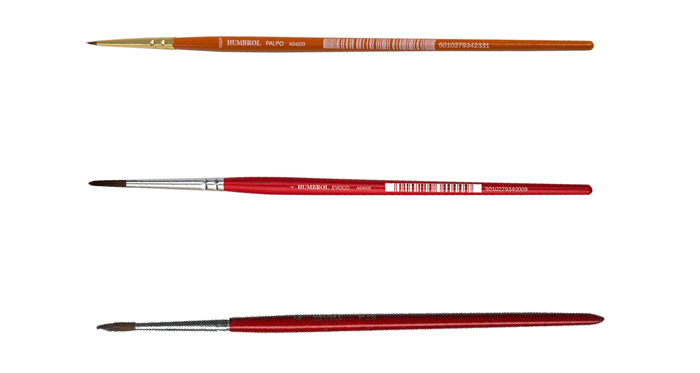
The Revel range of brushes is split in two. The first is their Standard Paintbrush range. These are good all-round brushes suitable for a lot of the tasks a modeller would want to undertake. The second range of brushes is their Luxury Paintbrushes. These brushes are a little different, in fact they have a triangular shape handle as opposed to the more well-known cylindrical brush. This does make the brushes a little more expensive, as well as the fact the brushes are finer, which we will come onto later, but are a nicer brush to use for longer periods, especially when detailing models.

The Revell Luxury Paintbrushes have triangle handles for a more comfortable hold
The benefit of the shape is that they are more ergonomic and easier to handle (also, they don't roll off your desk! - Ed). This means that you can hold them more easily, and ultimately have more control of the brush as a whole. Because of that, this also means these brushes are perfect for very detailed work. Humbrol also produce a similar set of brushes - Revell's are available individually and in a pack, Humbrol have chosen to sell theirs exclusively in the AXG4304 Ergonomic Brush Pack.
Traditionally the 'Tuft' of the brush (the bristles you put the paint on) was made of animal hair. Depending on the quality of the brush, a different animal hair was used. The older stiffer bristles were made from Hog hair and were referred to as China or Chungking bristles. Softer and more expensive bristles were made from ox, squirrel or sable hair, with the sable known for being the higher quality. These types of brushes are still produced, however with the invention of synthetic brushes, and the advancement of these and the paints used, animal hair brushes are becoming less common.
Synthetic brushes are made from extruded nylon, polyester or taklon, and vary in softness and feel. The softer brushes are made of thinner and higher quantity of individual bristles and can easily rival those made from animal hair. You tend to find the harder the brush, the cheaper it will be as less work is required to manufacturer this kind of brush. Think of the difference between the brushes used for modelling and those used for arts and crafts; the modelling brushes are a lot softer.
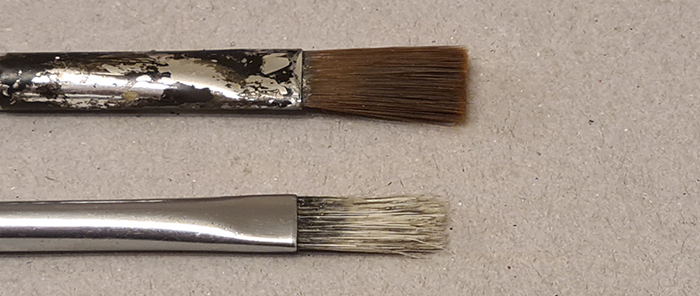
Top is a softer synthetic brush compared to a cheaper harder brush
So why do we want soft brushes? Well, it all affects the end result. Harder brushes, as previously mentioned, are made of less bristles. This means that there is less surface area for spreading your paint. A harder brush means more noticeable brush marks, as the image below illustrates.
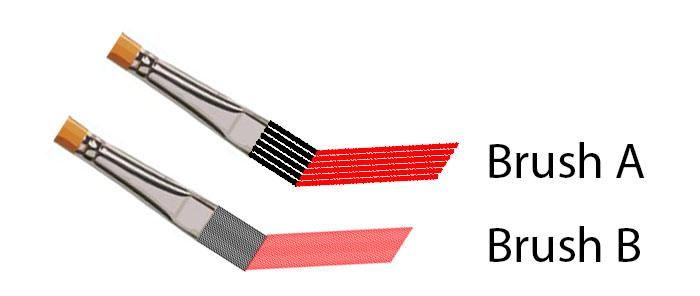
Although crude, the image demonstrates that the more smaller bristles you have, the smoother the finished result. The downside of this is that the brushes do tend to be dearer, but the price difference between the more basic Evoco brushes and the softer Palpo brushes is small, especially when you see the difference in the results. If, for whatever reason, you do opt for a harder brush, you can also reduce the amount of visible brush strokes by using a slightly thinned paint and apply it as several layers.
Regardless of the style of brush you have gone for, there is one thing all brushes need after use, and that is a good clean. The cleaning method for your brush will depend on what type of paint you have used. For enamel paints, the traditional thing to use was Turpentine, also known as terps, white spirit, or mineral spirits. This refers to a family of liquids, usually derived from petroleum. Although they will clean enamel paint out of your brushes, there are some big downsides to using these. Firstly, there is the smell. They are very potent and are not suitable to be used in an enclosed space, and certainly not by anyone under the age of 18. The second main reason to avoid these is that they are actually rather strong chemicals. They are designed for industrial use so best avoided for model paints. Instead, we would recommend using Deluxe Materials Brush Magic.
Brush Magic is also suitable for cleaning acrylic paint from your brushes too, although water will do the same for these. Brush Magic has also been designed to restore brushes that have dried with paint still in them, so this is a very handy product to have alongside your paints. Just please note that is will also take off any paint from the handles of brushes and dissolve plastic brush handles, so do not submerge any part of the handle into the liquid.
The only other thing to think about when cleaning your brushes is not to let them stand in the water or cleaner for more than a couple of minutes. Instead, just dip your brush in the cleaning solution and then remove them and wipe them dry on a piece of kitchen paper or lint free cloth. If the brush is still dirty keep repeating this process until it is clean. When wiping the brush, also remember to wipe it as if you were painting with the cleaning fluid, as going against the bristles will cause them to instantly splay. This may sound like a obvious thing to say, however not leaving your brushes soaking will extend their life enormously.
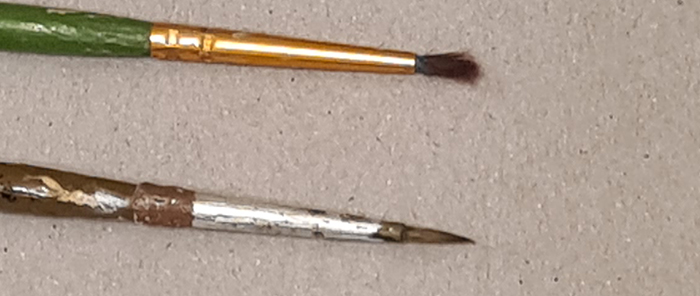
For those of you just starting out, a splayed brush is one that no longer holds its point when clean and not in use, as see here.
If your bristles are starting to splay apart, please do not be tempted to 'tip' or 'point' your brushes using your mouth. This is a technique where the user places the tip of the brush in their mouth and uses a combination of their lips and tongue to roll the brush back into a point. You will see many people doing this at exhibitions, but this is not good for you or your brush as firstly it is only a temporary solution. Although this does give you an initial point, it is only saliva holding the bristles together so it does not last past a few brush strokes, not to mention it is definitely not hygienic.
Secondly, although a lot of paints will not affect you if you get a small amount of them on your skin, if you take any of them into your body they can make you ill, and in the case of cadmium pigmented paints, which can still be found on the market, can make you seriously ill. Although this article isn't meant to scare you, there are some 'tried-and-tested' methods that really should not be considered in the modern world.
The happier side of this though is that a splayed brush can sometimes be mended. These bristles are generally glued into the ferrule of the brush (the metal collar) and then crimped. Submerging the bristles and ferrule into hot water for a few seconds will soften the glue, and one removed, allow you to spin the bristles back into a point using your forefinger and thumb. If you're not sure how to do this, have a quick look online and you will find some helpful YouTube tutorials.
The upshot of this is simple - the more you take care of your brushes, the longer they will last. A good brush is an investment, so next time you get the paints out, don't forget to select the right brush for the job and to clean them properly out afterwards. That way, you will have your brushes for life and they will always give you the best quality finish.