
 KEVIN PLAYER looks at a few techniques to enhance and improve the look of the preformed tunnels from Noch.
The techniques provided in enhancing here can also be applied to your own formers and scenic requirements, not just the preformed tunnel seen here. Practice on a small area or piece of card, have fun with experiencing how the products perform and the effects that can be achieved, and you will soon find how easy it is to create realistic scenery on your layout or diorama.
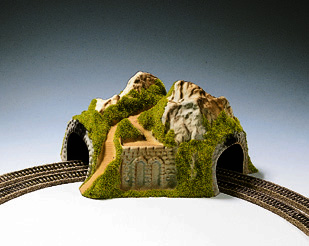
For this article I am enhancing the scenic appearance of a preformed Noch tunnel, in this case N34730; a two road N gauge tunnel. Noch, produce a variety of preformed tunnels from Z Scale, through N Scale, to TT Scale, and up to HO Scale. These are either single or double track.
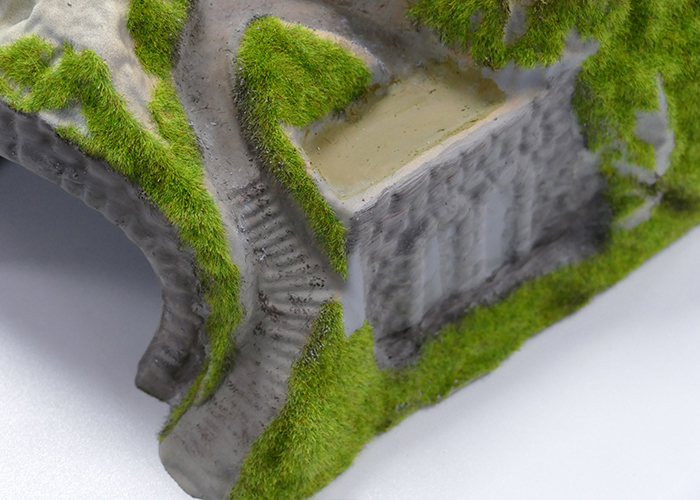
I weathered the walkway around the tunnel first, for this I used Noch Terrain Structure Past, field and nature N60823, which is supplied in 3 bottles representing sand, clay, and soil. Colours can be mixed or blended together easily to create your own mix. Noch also produce industrial shades - asphalt, concrete and mud under reference N60824. On completion the paint was left to dry, which does not take long. Application was by brushing the paste in the desired area using a stiff flat brush and stippled before drying to prevent any brush marks.
The next job was to apply the rock effect using Noch Rock Compound. I elected to use the Granite effect, but Noch also produce a Sandstone effect too. The product is a powder compound which you mix with water as you would plaster. Due to the products composition, it forms a rocky surface rather than a fine paste. You apply it using a knife or spatula and it will harden after approximately 15 to 20 minutes, depending on water content. On application I added a slight strata effect by drawing the edge of the spatula horizontally along the surface. I then left it to fully cure until the following day before starting the next stage. This time can be reduced due to the relatively short drying time, and conditions in the room the modelling is being undertaken in.
Next, I picked out the preformed stone areas around the tunnel mouth and support wall using grey-green acrylic paint. The choice here is yours and you just need to decide which colour best matches your scene.

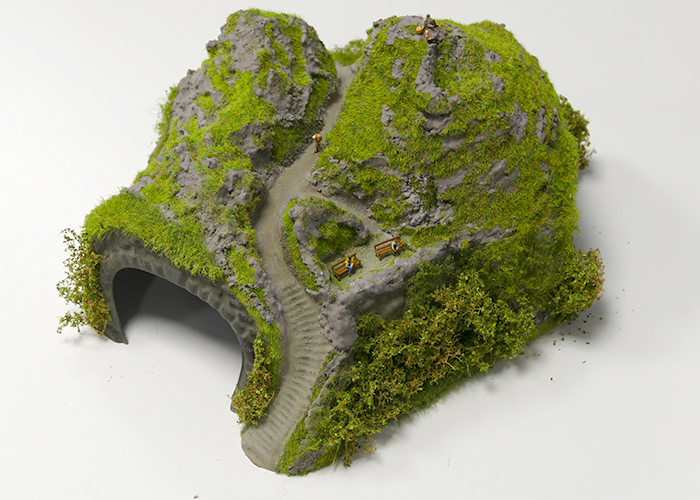
Now we have a good base to start the scenic effect. As the tunnel only has a height of 120cm, around 60 foot in scale, I did not want the rock to be to dominant, as grass will easily grow at this height. For the support wall area I decided to apply the longer 6mm grass fibres. These come in a selection of colours from beige, to greens and golden yellows. On selecting the shade of green I required, a proportion of golden yellow was also mixed into the green fibres, providing a more realistic grass effect.
If I were working on larger area, I would mix several shades together plus the golden yellow to represent dead grass between live grass. These fibres were applied using the Noch Grass Master. The standard unit can also be found in the Gaugemaster range under reference GM144.
When using a grass applicator as above, it is advisable to use Grass Glue for fixing the grass fibres down. The reason being is that the fibres will flutter down from the applicator into the adhesive. PVA will form a skin relatively quickly, and in many cases this is not particularly visible. With the skin starting to form, this will prevent the fibres from penetrating into the adhesive. This in turn results in the fibres laying flat not upright and reducing or removing a realistic grass effect, and sometimes not hold the grass at all. The Grass Glue takes much longer before it will form a skin, which will allow you to produce nice, upright grass.
After applying the 6mm fibres I grassed the rock faces, and for this I used 2.5 mm fibres. These fibres come in several shades and different pack sizes. Within the Noch range 20g bags are produced, but Noch also supply some of the same shades in 50g bags and 100g containers. This length is also produced within the Gaugemaster Scenics Range.
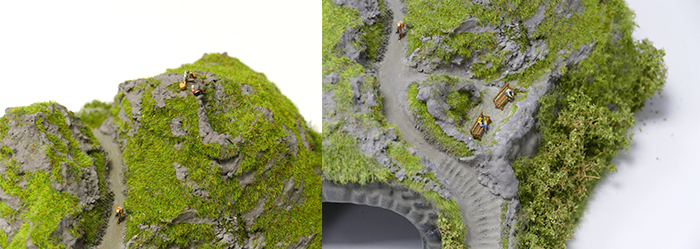
The 2.5 mm fibres were applied using a Puffer Bottle. The puffer bottles are made from a material that builds up the static charge of the fibres, making them stand up on application. For application you only fill the bottle up to 3/4 full. This ensures the fibres move up and down when the bottle is shaken building up the static charge. For adhesive, I still used the grass glue, but for this application method we will be projecting the fibres into the adhesive. To apply the grass, simultaneously you shake and squeeze the bottle closest to the aperture end, which is wider, making application easier. When applying to more flat areas, at the same time as shaking and squeezing, you turn the bottle at different angles. This results in a more realistic grass effect with fibres standing at different angles, like the real thing. Especially important for field areas, again different shades of grass mixed up together, produce a more realistic effect.
After applying the grass, the adhesive was left to fully dry, again I left it to the following evening. The excess fibres were then vacuumed up, as you will apply more fibres than required to produce the desired effect. These fibres can be reused resulting in little to no waste. The result was then reviewed, I then applied more grass to the required areas. In some areas, using a dry brush method I applied more adhesive on top of the previously applied grass adding a little more height, providing a more realistic effect. Again, the adhesive was left to fully dry before vacuuming off the excessive fibres. Number one rule, apply more fibres than you think you need, remember nothing is wasted.
To enhance the scenic effect I then applied Leafy Foliage. This product is teased out to produce the desired effect from thick undergrowth or to represent creepers climbing the rock face. I then added a few bushes using Seafoam. This a natural product that can be used to make either trees or bushes. It can be used directly from the box representing dead trees or bushes or you can apply Leaves. These are made in shades from light, to mid, and dark green.
For a more realistic appearance I mix different shades together in different ratios to remove the uniformity in colour, which in my opinion is a more natural result. To apply the leaves, I place the mix of leaves in a plastic bag. Suitable Seafoam is selected from the box, this is given a quick spray of Haftfix Spray Glue and immediately after spraying the Seafoam is dropped into the bag of leaves. Holding the top of the bag gently bounce around the leaves by tapping the bottom of the bag. As you remove the Seafoam, gently twist it within the bag to shake off excess leaves. Inspect the result, if undesirable bare patches exist, repeat the process. When satisfied with the result, give your bush or tree another quick spray of adhesive to set the leaves. Should the leaves be too dense, put it to one side for possible future use. The Seafoam was then glued to the required areas of the tunnel using Grass Glue. Instead of the Hatfix, you can use hair spray. The one you will require is firm hold, non perfumed, being the cheapest you can find. This makes hair look like a sourer, but good adhesive qualities. You use the same application technique but give the Seafoam a slightly longer and heavier spray as this isn't as sticky as the Hatfix.
The tunnel need not just be a stand-alone item, you can build around it, merging it into your own scenery as you apply each stage. To bring life to our example I added some wanderers, in this case from the Merten range MRT0272544. Between the Noch, Preiser, Merten and Faller ranges you have hundreds of figure sets to choose from.
And there we have it, a simple but effective project, completed in less than a week.