

 JAMES HICKMAN looks at this handy range of OO Scale lighting.
It really is 'Lights, Camera, Action!' for model railways these days. Back in the day many modellers will remember the thrill of adding another wagon to their Hornby 'Dublo' railway or standing another figure up on their Airfix platform, however the modern modeller now looks for ever more increasing levels and details for their model railways. With the addition of DCC control and the production of locomotives from Roco with cameras on board, we have the camera covered. Action-wise we have many ways of animating parts of our model railways with running locomotives, working vehicles and even figures that move.
That's the action sorted, but what about the lights? Even nowadays I see many exquisite railways on the exhibition circuit but there is one thing that blights many of these models. Their buildings are nicely planted, their vehicles are all correct to the time period, and the railway runs like clockwork. Many hours have been spent deliberating the great questions; Analogue or DCC, motorised or non-motorised points and signals, and somewhere in the midst of the electrical minefield, the simplest topic of lighting is seen to be a quite literally a dark art.
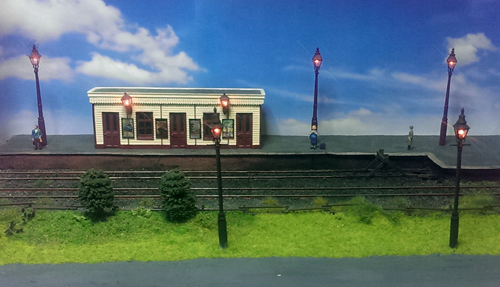
Many layouts suffer from this lack of working lighting often, sacrificing the standard of their layouts for opting for non-scale, non-working versions to 'make it easy' or to 'keep the cost down'. Compared to wiring up the track, wiring lighting is easy, less wires than a point motor, and less transformers than a three track layout. In this article I hope to show how easy and affordable it is. Cue the Lighting range from Gaugemaster!
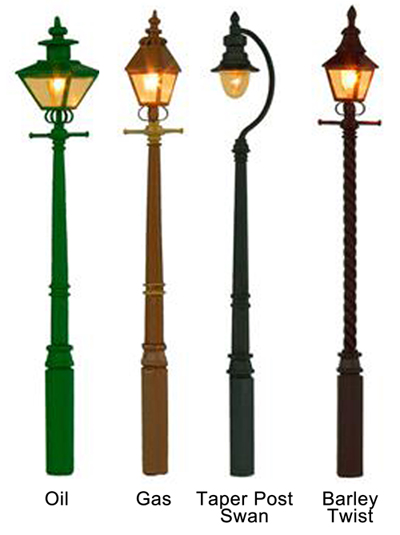
The range of OO lamps from Gaugemaster were released September 2016 at our Open Weekend. The first to be installed across the railway network were the oil lamps. These lamps heads were much larger than the later gas lamps but stood just as high. The second type of lamp in the range is the gas lamp. This is reproduced in our range in two variants. The standard stem look and the ornate 'Barley Twist' versions. These 'twists' have been accurately scaled from the original, with the exact number of 'twists' at precisely the right angle.
The later additions to the UK were the 'Swan-Neck' lamp. These lamps had curved necks like a swan from where they get the name. These lamps allow more of the light to be focused on the ground below rather than lighting up the general area. These lamps survived for many years through and past the BR era. The lamps have been modelled in five colours, three of which represent different regions. These are GWR Cream, LMS Maroon, SR Green, Undercoat Grey and Plain Black.
Unfortunately there is not enough information available on the LNER lamps of the colour schemes for us to confidently portray these lamps, however they will happily take a coat of paint for those of you with an idea of the colour that yours should be. For this I would recommend using the Grey Undercoat models as you will not have to add an undercoat! These lamps can be representative of those found all the way through eras 3 to 7, with some being converted to electric use and still survive to this day. In addition to these floor mounted lamps there is also the wall mounted variants. These are available in either gas or swan neck variants and available in the aforementioned colours.
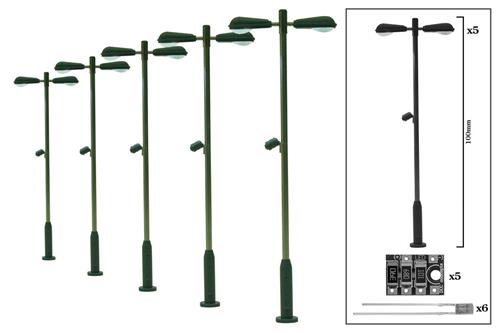
For the Modern Image modellers there are lamps of a style common on our railways today. These have been around in varying colour schemes for years, but would happily suit any modern image layout as they stand. They are produced in both single and double headed variants with the added detail of having the station announcement system speakers on every other pole.
The Oil, Gas, and Swan Neck lamps are sold in packs of three and the wall-mounted versions are available in packs of two. There are value packs as well, which contain five free-standing lamps and two wall-mounted lamps, allowing you to light up a larger area with even better value. The single headed modern lamps are available in packs of four and eight, and the double headed version in packs of three and five.
The lights themselves are made from brass and are finely scaled for OO modellers. The height can be adjusted by using the different sized stems that are provided for the Oil, Gas, and Swan Neck lamps and the modern lamps can also be raised and lowered to allow differences in height for ground level and platform heights. The packs of lights also include LEDs for use in buildings, so these packs are great value. Additional LEDs and resistors are also available separately in the Gaugemaster Lighting range.
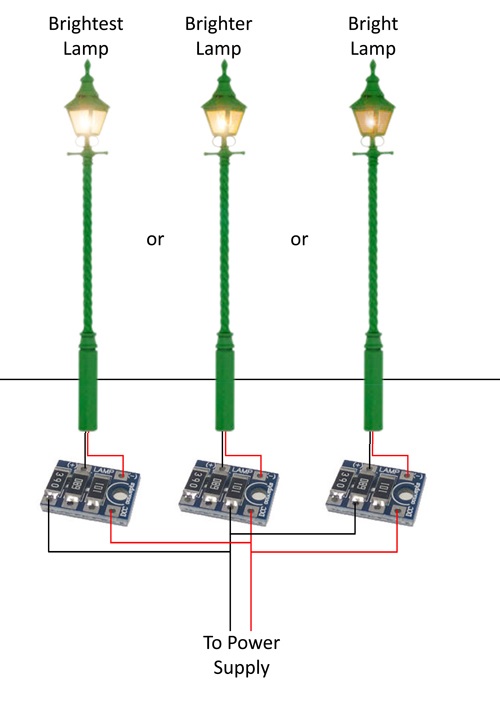
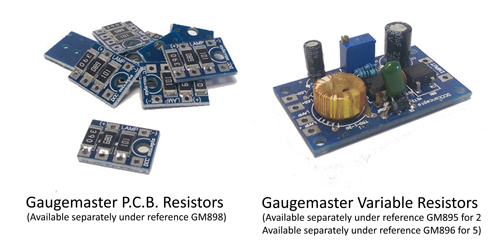
The lamps themselves are very easy to install. Each pack comes with either a pack of resistors or a variable resistor board. If you have the resistor pack there are three options. On the resister PCB there are two terminals labelled up as 'lamp +' and 'lamp -'. This is where you attach the wires from the lamp. The longer wire attaches to the 'lamp +' and the shorter to the 'lamp -'. The next stage is to attach the feed wires. One wire attaches to the terminal opposite the 'lamp -' terminal and goes to your power supply. The second wire from your supply attaches to one of the other terminals on the opposing side to the lamp. There are three options here. You can attach the second wire to either of these terminals, but the brightness will depend on which one you do. See the diagram below for more information.
If you have the adjustable resistor it is just as easy. The wires from the lamp are attached to the 'lamp +' and 'lamp -' terminals as described above. The feed is attached to the input terminals. To adjust the brightness of the resistor simply use a screwdriver to turn the adjustment screw found on the top of the board.
That's it, the wiring is that easy. We recommend the use of Gaugemaster's GMC-WM2 9 volt transformer. Now all you need to do it turn the lights on. Some modellers prefer adding an additional switch into the circuit to be able to independently switch off sections of lights. This can be done with the GM507 Miniature Toggle Switch (Available in packs of 25 under the reference BPGM507) or the larger version GM503 (Available in packs of 25 under the reference BPGM503).
In the last few years stations across the network have added sensors to platform lighting. This allows the lights to brighten when movement in the area is detected. The aim of this is to save power and decrease light pollution. If, like me, you like that added extra piece of realism to your layouts, this can be achieved with a simple piece of wiring as shown below.
Click image for larger version.
Reed switches will need to be added into the track and magnets applied to the underside of the locomotives. Once this is done the locomotive will switch the lights from power saving (dim) mode to a brighter light. If this works in reverse simply switch the connections over on terminals 2 and 3 and terminals 5 and 6. I would recommend placing the reed switches approximately one to two inches before the lamp to allow for realistic operation. To complete this you would need GM500 Relays and a variable resistor.
That is just one idea for where you can take our lights. Another idea would be to wire one or two of the lamps on a layout to a Train Tech TTAL21 Flashing Unit to simulate a faulty bulb. There are many other lighting effects for your layouts to add that additional 'spark' to a layout, and the Gaugemaster lights are just one of these, although they are one of the best ways to enter into the world of layout lighting!