
 PAT PETTETT concludes his advice on how to start out in G Scale.
So we have a starter set and a few extras, and we may even have been running it in the garden – so how do we get our outdoor empire underway? In this second part, we look at getting things more permanent.
First off, the patio (or similar) line. By far the easiest to get running, as little civil engineering is required. You still need to think about where things will go however!
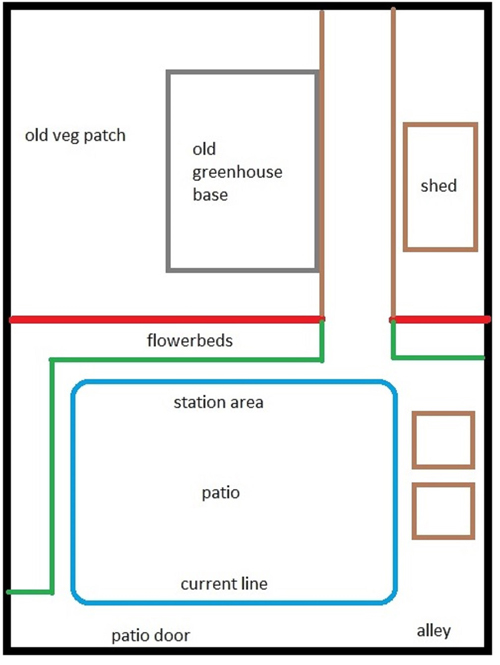
Pay attention to where people walk, where clotheslines are – we do not want to enrage the domestic authorities! As my line is on the patio, I spend far more time looking down than up. As a result, my main station area lies directly under the washing line – It just didn’t occur to me that it was there. Whilst the track is quite happy to be stepped on, it does make hanging the washing more awkward...
As the line runs right round the perimeter of the patio (for the longest run possible) it means the line also runs right past the patio door, and it also runs across the access from the side alleyway. Unfortunately this means I have to bump the wheelie bins over the track once a week...
Drainage is also something to consider – one corner of the patio tilts away, to enable water to run off. The drop here is quite severe – normally G scale track and trains are remarkably accepting of variation in grade, but combined with a sharp corner, I found rolling stock had a tendency to tip outward when it reached the curve. The result was derailments! The track was easily packed up underneath using old roof tiles. Whilst uneven track will still run, you need to ensure that the track is stable and doesn’t rise and fall with the passage of trains – this puts a lot of wear and tear on the fishplates and can lead to poor running.
All very good fun so far, but we are still more at the train set stage and we can do much more to make the line an integral part of the garden. We now need to decide if our line will be raised above the ground (more construction but easier to run and maintain) or at ground level (better looking, less engineering but not as easy to run the older you get).
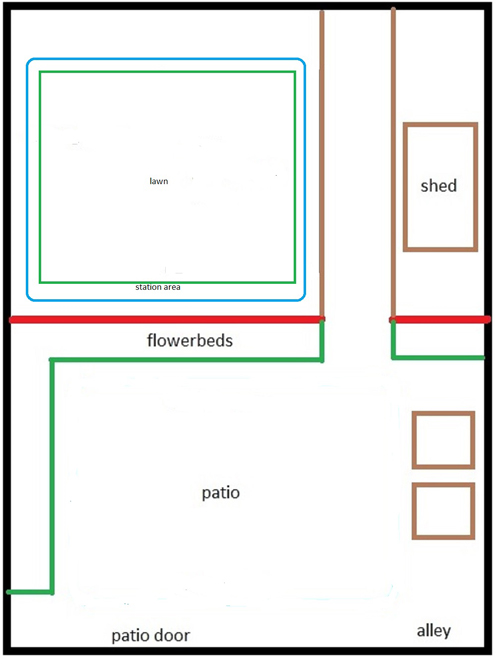
For my garden I’ve chosen the ground level option – once I finally manage to remove the huge slab of concrete that supported the greenhouse, a lawn will be laid and the intention is to run the track around the perimeter. This will free up the patio for the kids! Whilst the patio line has kept me out of trouble for many years, I’ve always wanted it to be more scenic – I feel the ground level line will be less intrusive visually and my knees have a few years left in them yet.
The garden is currently laid out like this:

The new arrangement will look like this:

The line will be embedded in the flowerbeds surrounding the new lawn. Much like the full size railway, we will need a proper base for the track to sit on – we cannot just pop the track on the mud, as the mud will expand and contract with rain and sun, and we would spend more time picking weeds from between the sleepers than we would running trains.
The track base needs to drain well, prevent weeds growing through the track, and hold the track in place – we will basically create a smaller version of a full size line. We will need a shovel, ballast, spirit level, and something like a pond liner.
Each running line will have a shallow trench cut for it – maybe six inches deep, and as wide as we want the ballast to be. As a general rule, keep the trench as wide as the overhang on your longest vehicle that you will be running.
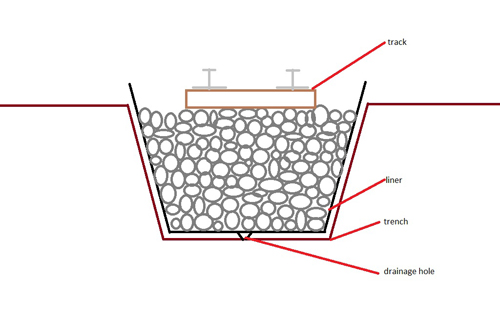
Lay some of the track on the floor so you can see where it will go, then pick it up again and dig out a trench – work in short sections, to avoid deviating from the track line. As you go, lay the pond liner or membrane into the trench, and cut it back, leaving an inch or so above ground level. This will hold water at the moment, so we need to make holes for drainage – a sharp implement can be used to punch a hole at the bottom of the liner. This will enable water to run away, but will prevent weeds from growing in the track area. One hole every foot or so should be enough. As each section of liner is laid, the ballast can be tipped in.
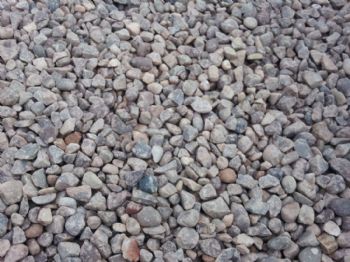
The ballast size is down to personal preference, but the most important thing is to choose a gravel that isn’t too rounded – if it is, the ballast will roll about on itself, and our track will go with it! A sharper ballast with points will lock together, be less likely to get washed away, and will hold the track in place better. Something like this is ideal:

With the ballast in the trench, we can start laying the track – to start with, simply lay it on top. As we do not have a G scale ballast tamper, wiggling the track from side to side will do! Wiggle until it sits in the ballast, this will stop any sideways movement. Check you are running level with the spirit level as you go – if the track is dropping too low, raise the track gently and push more ballast underneath. If it is too high, wiggle some more! A cross section of our trench will look like this:

Much like a real railway, this will hold the track remarkably well – and any problems caused by the weather can easily be remedied, simply wiggle the track down or pack it up with more ballast as needed.
Tunnels have always been a favourite – they break a layout up into distinct visual sections, the train seems to go somewhere even on a basically circular layout. As with indoor layouts, we need to think about how to access a train that potentially derails in a tunnel.
Two common construction methods are using concrete pipes of suitably large diameter, or a “cut and cover” style using paving slabs or similar. A concrete pipe is more suited to places where the ground level is much higher than the track level – but don’t make the tunnel any longer than twice the length of your arm! This ensures you can reach something stuck in the middle.
A cut and cover style tunnel is more suited to places where the ground level is not rising that far above the track, and if the tunnel roof is made from paving slabs (and not buried under earth) you can easily lift the slab to reach a derailed train – the benefit here is the tunnel can be as long as you like!
Remember to angle the slabs outwards, to resist the pressure from the soil:

So, we’ve taken you from starter set to outdoor model railway and at this point the possibilities are almost endless so too much to document. However, we welcome such discussions in our store where we are always available for advice and suggestions. Ask for me in person or on the phone if you are looking to get into G Scale.