

I have been painting various figures for about 20 years, starting with fantasy wargaming figures and later using the techniques I have learnt for models of every description. If you are using a technique or material that I don’t, please tell me! By far the most important things to have when painting figures are good tools and equipment, and we will look at those in detail first.
 There is absolutely no point in using cheap nylon or similar brushes - you will just get a cheap looking paint job and in my experience artificial paintbrushes do not last very well. Get some good quality sable or squirrel-hair brushes - I use the sable brushes available from Games Workshop, but most art stores will have the squirrel hair ones. Don’t be put off by the price, natural fibres may cost more but treated well they will last for years, my current set being over 5 years old. A good brush tip is very important - most good art shops should let you have a small dish of water to test how neat the tip of a brush is when wet.
 Do not use enamel paints!! They are fine for railway rolling stock or anywhere where a smooth clean finish is desired, but acrylic paints are much better for figures and the best I have found to date have been the Games Workshop/Citadel ones, as they are designed for figure painting. Don’t use the Tamiya, as they are designed for radio control cars and are very good when spray-painted over time with several coats but they do not cover well with single application work. Games Workshop acrylics have astonishing covering power - you can use a bright yellow colour over a black undercoat with great success.
It can take a while to get used to these paints, but there are many benefits:
 Often, buying paints like this can be a little confusing and it may take time to get used to some of the names of colours, as they are intended for fantasy wargaming. Don’t be surprised to find Orc Flesh and Zombie Flesh, but the range of colours is fantastic and includes metallic colours too.
It is worth mentioning at this point that metallic red is a hard colour to achieve. This is because the aluminium filings used in most metallics do not bond well with the chemicals used for red pigmentation. When did you last see a metallic red car? Purple, blue, green etc work well with metallic finishes however.
The only other things you are likely to find useful are a palette for mixing colours and some rags. In the case of the palette, use a small one as when painting figures only a very small amount of paint is needed and a large palette just wastes paint - your thumb is an ideal palette to mix a colour, so use that as a guide. As for the rags, an old t-shirt is best. Do not use toilet roll or kitchen roll, as this will adhere to the brush.
 The paint will flow from the brush best when it is damp, not wet or soaked. Dip the brush in water and then close the rag gently around the brush. Pull the brush through the rag (imagine a Samurai cleaning his sword after battle).
Shake the paint well before use. Don’t ‘plonk’ the brush into the paint pot - use the paint from the lid of the pot. When you have used all this, simply replace the lid and shake again, open and once more use paint from the inside of the lid and not the container itself.
The reason behind this is that if you dip the brush straight into the paint pot, paint will filter between the bristles near the metal ferrule. This forces the bristles apart and will not only ruin the brush but also make accurate painting impossible.
 For example, if this is the tip of your paintbrush when wet:
 You need this much paint on the brush:
 Not this much:
This will mean you have to reload your brush regularly for large areas. You will get a more even finish if you rinse and wipe the brush each time you need to reload. Paint the model from the inside out. For instance, suppose we are painting a figure of a Conan The Barbarian type figure. He has bare arms and legs and a metal breastplate held on by leather straps. Firstly, you would paint the breastplate and straps with a black undercoat. Next paint the breastplate silver and the straps brown. Only then would you apply the colouring to the arms and legs. Painting this way means you can almost rush the silver and brown on - the fresh colour applied afterwards would cover any overspill of these colours. You will need a much steadier hand to paint the thin brown straps after the larger flesh coloured areas to avoid making mistakes. Basically, painting the least accessible areas first means that you automatically cover up mistakes. However, very fine detailing should be left until last.
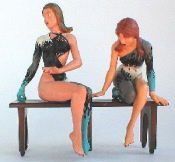 You need to move and control the brush as if you are using a pen, not an emulsion brush. When you write, you rest your hand on the paper to stop it moving about and you use your fingers to move the pen nib in order to produce legible text. When using a paintbrush, the brush is your pen and the model is your paper. You cannot write on a sheet of paper in mid-air, you need something to press on.
Everyone who paints seriously has his or her own special painting position. I’m a strange person who sits on a cushion in front of my empty armchair and this is where I paint. I hold the model in my left hand, the brush in my right and rest both hands on my right knee. You can do the same at a table or desk; however, get a heavy object like a brick and put that on your desk - the brick is your alternative knee, and resting both hands on it limits movement between the two. Now you only need steady fingertips, and not steady hands.
Eyes are possibly the most important part of a figure, as eyes are the windows of the soul. Let us take the painting of the eyes step by step.
To paint the pupils look at the face head on, as if you are staring into their eyes. Rotate the whole model to the angle of their vision - in other words, put yourself where you think the model is looking, so that once again you would be staring into the models eyes. Using your smallest brush and the smallest hint of paint, touch the part of the eyeball closest to you with the tip of the brush. Do the same with the left eyeball. This effect always looks better than having the models looking straight ahead - they will look like a startled rabbit in headlights otherwise!
If you must have a model looking straight ahead, make them look up or down using the same method as described above. Never put the iris in the center of the eye. Walking people generally look at the floor 6 feet ahead, whilst people in conversation move their eyes, not their heads.
Another feature on the face can be obtained by mixing a minute amount of black or brown acrylic ink to flesh colours, then paint the lower face to simulate ‘five o’clock shadow’. Also, the mouth is very expressive and careful painting can make a model look grumpy or happy. This is easier to do on female models (due to lipstick) than male models. For the gentlemen, use a tiny amount of brown paint or ink to tilt the corners of the mouth up or down - down for a grizzled, seasoned veteran warrior or old man tired of waiting, and up so a slightly inebriated and merry wedding guest.
There are more advanced techniques like blending and shading and I will cover these in another article, as these methods are not necessary for larger figures but work best on smaller 1/72nd and 1/87th scales and help to emphasize texture and contrast. I find the size of the larger scales such as 1/22.5 and 1/32 means they create their own shading in natural light. The pre-painted figures by Preiser are lightly shaded, but the effect is limited unlike wargaming figures where the contrast and texture are over-emphasized for dramatic effect.
If you have and questions or have any other points about the information here, please feel free to contact me at the Engine Shed and I will be happy to hear from you. Otherwise, happy painting!
The next article is Painting Figures Part 2.