

 GREG SPEARS takes you through the switches in the Gaugemaster range, and their applications.
As head of the workshop, I tend to hear the most commonly asked questions from our customers, and one such question is "which switch do I need?" So, in this article we are going to recap on some popular switch types and how to use them.
The simplest is a push button. These are available in packs of five or twenty-five. The common ones have two terminals to attach your wires and when you push down it makes contact and completes the circuit.
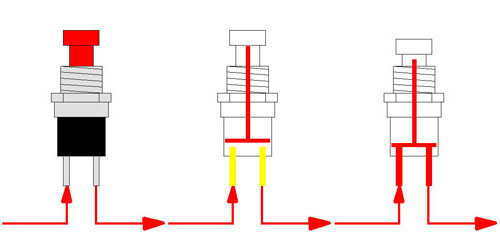
Think of these like a doorbell; you press it to make it work and it stops when you let go. These are popular for coil/solenoid style devices like point motors or uncoupling units, and many of the semaphore signals also recommend this type of switch. The switches are available in lots of different colours to help coordinate them and their simple design makes them very robust. There is a push to break version if required.
Next, we will look at slide switches, which in a lot of ways are very similar to toggle switches. They are available in singles and bulk packs of twenty-five. In this example we are going to look at a DPDT centre off switch which itself requires an explanation.
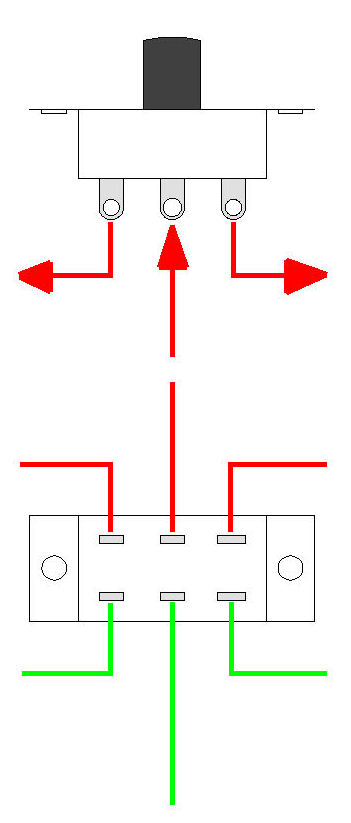
'DPDT' stands for 'double pole, double throw' – look at this diagram as you can see there are two rows of three marked with red and green. They are the poles (DP) and possible output options, not counting centre off, are also two which is the throw (DT). Variations on poles and throws are covered in the toggle switch section below.
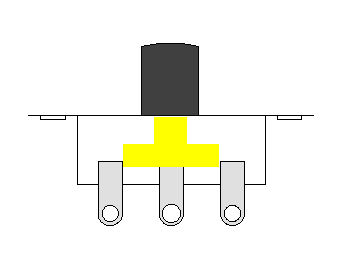
If we look inside the switch we see the three terminal contacts in grey and the sliding contact plate in yellow. In this picture the switch is in its centre OFF position and sliding it left or right would result in the centre terminal connecting to the one of the two outer terminals.
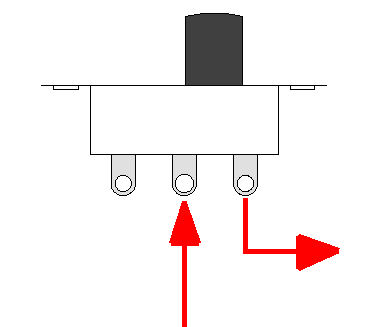
We could use the switch to turn one or two things on or off. Remember, you don't need to use all the terminals if you don't need them. Connecting to the centre terminal and one outer will make a simple ON/OFF or by using the whole switch we can reverse polarity as shown in this diagram.
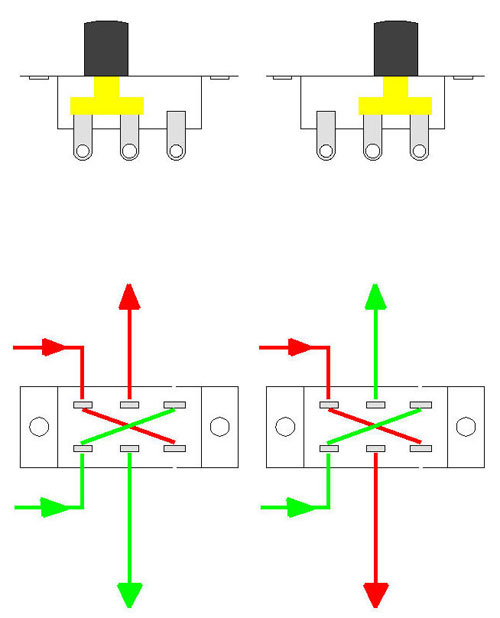
Slide switches take a little extra work to mount in comparison to a toggle or push button, but remember these types of principles can be applied on different switch styles.
Toggle switches are very popular as there are lots of switching options and are easy to mount, and the chrome finish never fails to give a professional look. They are available in two sizes, and in singles and packs of twenty-five.
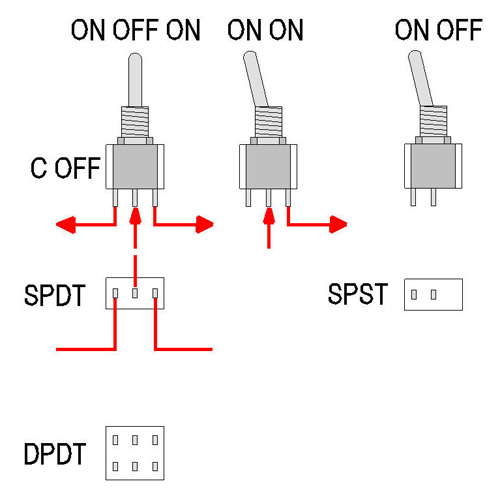
In this picture we can see several throw options and single and double pole layouts. The ON-OFF-ON has a centre off upright position which could be either sprung return or manual. The sprung self-centreing option is the most popular for point motor switching or as an alternative to push to make. The double throw DT switch in the picture can be used as an ON-ON as you don't need to use both terminals, but a single pole SP ON-OFF version is available.
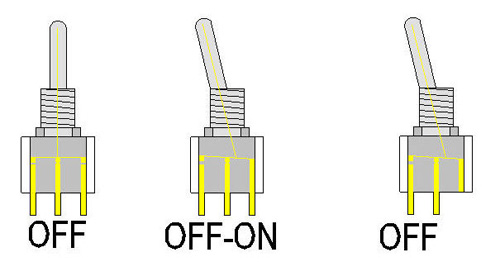
If you look at the yellow contacts inside these switches you can see how the position of the operating bar effects the internal contacts. Just about every aspect of your layout can be controlled with switches and the toggle is a firm favourite.
Finally, we have the rotary switch, which is very popular for section and cab control due to the multiple contact and position options. These are sold in singles, and we even do a knob to stick on top.
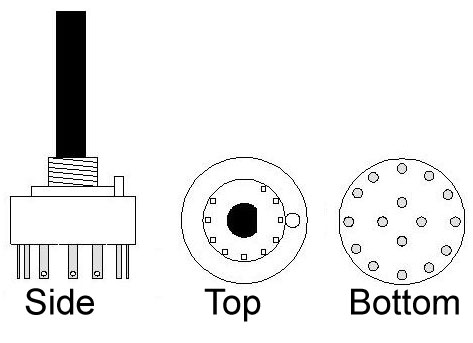
Above is a top, bottom, and side view of a typical rotary switch, and below is an enlarged view of the stop adjustment face. Located under the fixing nut of the switch is a special washer that locates into the holes labelled 2 – 11 to restrict the rotation if required, obviously 1 is not required and 12 can be achieved by removing the washer altogether.
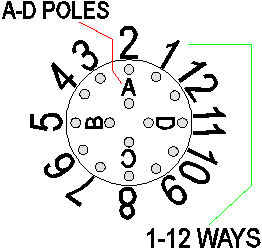
Like the other switches it still has holes and are labelled A to D depending on the switch variant. 'Throws' are now called 'ways' and ours have a maximum of 12. The rotary switch shown here is a 4 pole 4 way - this is because the way terminals are always divided by the poles. So, pole A is connected to way 1 – pole B to way 4 – pole C to way 7 and pole D to way 10, when we twist the switch pole A goes to 2 and pole B to 5 and so on.
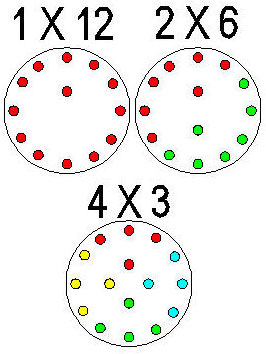
Here we can see some of the variations, there is also a 3 x 4 that we have not shown. Remember switches work in both directions so although you might assume that you go in A and come out 1-2-3 but it could just as easily come in 1-2-3 and going to A. So yes, we probably do have a switch to do what you need, but how would you like to do it?